|
|
London North Western
Railway:
Midland
Railway:
Stratford
Midland Junction Railway
|
|
Kenilworth Station
Kenilworth Station saw its first fare paying passenger on
9th December 1844 when the Coventry to Leamington (Milverton) single branch
line was opened. The only intermediate station on the route, Kenilworth
station, was 'Italianate' in style and had a pitched roof that also covered the
platform supported by ornate cantilevered brackets. The structure was designed
by the London & Birmingham (L&B) resident engineer, Robert Dockray. The
traffic levels were originally thought to be easily handled by one locomotive,
an estimate soon apparently wrong. Within five months the traffic levels
compelled the L&B, to install coal facilities with sidings running parallel
to the main line toward Whitemoor Road being in place by 1846. In addition to
the sidings for goods traffic, a passing loop and a second platform was
installed at Kenilworth, probably by 1845. Robin Leach maintains in his book
'Rails to Kenilworth and Milverton' (1999) it is almost certain, the
weighbridge and carriage landing were also in use by this date. In the summer
of 1872 a siding from this loop was laid into Whitemoor Brickworks and six
years later another connecting to it was put down running parallel to the main
line toward Whitemoor Road (see image 'lnwrk3786'.
By 1881 the coal shed is known to have been erected in what
was then the coal yard, this being positioned at the Coventry end of the
station, whereas the good yard, a much smaller affair was at the Leamington end
of the station. The presence of a crane suggests that not only coal moved
through the coal yard. The points box near the goods shed is known to have
existed in the years 1872 and 1878. Distances marked on signal installation
plans show that this box was used for controlling the points and signals for
both brickworks sidings. The ground frame is known to be in use between 1879
and 1883 and from evidence seen in image 'lnwrk3786' it appears the control position was moved.
The information on the installation of the Brickworks siding also mentions that
the related pointwork connecting it to the loop was 'between two points
boxes'. This suggests a third site for signalling control and this could be
the building alongside the level crossing.
Traffic grew to such an extent, both directly for the area
as well as being an alternative through route avoiding the London to Birmingham
and Trent Valley lines, that a number of developments occurred. In an attempt
to attract traffic from the Leamington, which had become a fashionable place to
commute to Birmingham from via the GWR line, a cut off was initiated to avoid
Coventry by the development of a double track from just North of Kenilworth to
Berkswell station. This double track met the Coventry to Leamington line at
Common Lane and its double track was extended not just to Leamington by the
doubling of the single line but through to Rugby by mid-1884. This increase in
traffic warranted the building of a new station which was duly completed in
1883. The rebuilding also embraced remodelling of the station's layout which
saw the location of the goods yard and coal yard reversed. The goods yard
becoming the coal yard and vice-a-versa. The former coal yard sidings were
shortened and walled in and the crane was moved, and it appears the former coal
shed was also moved and its use altered to that of a goods shed. The former
goods yard became the coal yard and the siding built as a carriage landing was
replaced by a cattle dock. The level crossing was retained until 1885 when it
was replaced by the 'Station Steps' footbridge. The complete transition of the
name Clarendon Street to Station Road took almost forty years, both names were
in use from the 1860s to the turn of the century. The original 1844 station
structure wasn't however completely lost because as recorded by Robin Leach the
Kings Arms' Assembly Rooms required a much more suitable entrance and the
sandstone facade of the original station was incorporated into the new frontage
on Station Road.
The Railway Clearing House's 1929 Handbook of Railway
Stations states Kenilworth station provided the general public and businesses
with the following services: Goods traffic; Passenger and Parcels traffic;
Furniture Vans, Carriages, Portable Engines, and Machines on Wheels; Live
Stock; Horse Boxes and Prize Cattle Vans; and Carriages (Horse-drawn - Ed) by
Passenger Trains (GPFLHC). The cranage facilities provided within the goods
yard had remained the same the 5 ton capacity as noted in the 1894 edition of
The Railway Clearing House Handbook of Railway Stations. Whilst this earlier
edition did not provide information to the same detail e.g. the number of
categories listed, and only recorded (GPFL), its reasonable to assume that the
same facilities recorded in 1929 were offered from the outset.
Robin Leach writes in 'Rails to Kenilworth and Milverton'
(1999), that 'Philip Horseman and Company of Wolverhampton won the contract
to build the new station at Kenilworth and excavations were begun in April
1883. By May (of that year) bricklayers, carpenters, labourers and a large
steam mortar mill were on the site and the new ground plan was becoming
visible. The original goods shed had been demolished and much of the clearing
for the new platforms had been done. By September (1883), work was progressing
rapidly and the main booking hall was nearing completion, showing off its
glazed roof and wall tiles. At about this time, the LNWR announced that in the
next session of parliament they were going to apply to stop the public footpath
which crossed on the level at the northern end of the station and replace it
with a footbridge. This idea was declared a great improvement, but it was not
until February 1885 that the footpath was given up. However, not everything was
going quite as it should. During the previous two or three years a great deal
of sewers had been laid in Station Road and unfortunately this work coincided
coincided with the reconstruction of the station. Station Road was now in ...
an abominable state ..." and it was impossible ".. . to get to the station
without getting your boots covered in mud." The Board quickly made the effort
to rectify the situation and relaid the whole road'.
Robin quotes the following description of the station from
the local paper. 'The new passenger station which has been for some time
under course of erection, is now completed, and will give ample accommodation
for the increased traffic which will doubtless result from the opening of the
new line from Berkswell. The style of the architecture is Gothic. The buildings
are faced with red pressed bricks, and moulded and enriched pressed brick
cornices, panels, labels and quoining, and with Hollington stone gable copings,
finials, corbels etc. In the centre of the block of buildings on the 'down'
side, and facing the approach road, is a handsome and lofty booking hall, 50
feet long by 28 feet wide, with ornamental open timber roof, surmounted by a
lantern, enriched with stained glass in the sidelights; the walls are faced
with glazed buff tiles, with ornamental dado of Minton's glazed tile, and the
floor is laid with encaustic paving. The booking office enclosure is of
pitch-pine, framed and panelled, with pierced cresting above the cornice. There
are also upon the down side first class ladies and gentlemen's waiting rooms,
second class ladies' room, and general waiting room, with lavatories, etc,
station master's office, with bay window, commanding a view of the entire
station, parcels office, etc,; Upon the 'up' side of the line are a large
general waiting-room, 50 feet long, ladies' room and other conveniences, A
footbridge is erected near to the north end of the station, for crossing the
railway, constructed with wrought iron lattice girders, and ornamental Gothic
arched spandrels and pilasters supporting the roof finished on the inside with
panelling in pitch pine, and glazed Gothic headed side lights. Spacious and
handsome staircases at either end of the bridge, conduct from the booking hall
on the one side of the line, to the large general waiting-room on the opposite
side: the steps composed of' Hawksley's patent treads, and the side walls of
stairs are dadoed to a height of five feet with Minton's glazed encaustic
tiles'.
'The whole of the joinery) including roof of hooking
hall, dadoes round waiting-rooms, doors and windows, and interior finishings,
is of best selected pitch pine, varnished, and the fanlights overall doors and
windows are filled with ornamental coloured lead-lights, by Messrs. Davies, of
Shrewsbury. The platforms are each 600 feet long by 20 feet wide, paved with
Val-de-Travers asphalte, with rubbed York- stone margins, and are covered,
their full width, for a length of nearly 200 feet, on each side, with light
wrought iron roofing, supported on ornamental cast iron columns and brackets.
The carriage stand in front of the station is also covered with roofing of a
similar description. The whole of the cast iron work has been supplied by
Messrs. Rudge and Griffith, of Stafford. Adjoining the station, at the north
end, is a lofty signal- box, built in style to correspond with the other
buildings, raised to a sufficient height to enable the pointsman to obtain a
clear view over the roof of the footbridge. The works have been carried out
under the control of H. Woodhouse, Esq., of Stafford, Chief Engineer of the
London and North Western Railway Company (Southern Division), from designs by
Mr. T W. Jones, of the Engineer's Office. The contract was entrusted to Messrs.
Horsman and Co., of Wolverhampton, by whom the work has been very
satisfactorily executed'.
The main building suffered fire damage in 1923 but according
to Preston Hendry et al, retained their much of their splendour even after
closure, when the station forecourt and goods yards became a builder's yard.
Local passenger services were withdrawn between Leamington to Coventry on 18th
January 1965 whilst local freight services had ceased on 4th January 1965.
People interested in learning more about Kenilworth Station
could do no better than read Robin Leach's book 'Rails to Kenilworth and
Milverton' (1999) and his earlier piece Kenilworth's Railway Age' (1985)
both published by Odibourne Press. These and other relevant reference books
are listed in our 'bibliography'.
External views of Kenilworth station
Inrernal Views of Kenilworth Station
Platform views of Kenilworth station
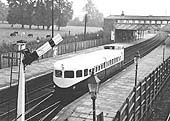
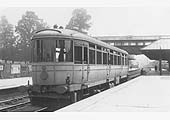
Trains seen at or near Kenilworth Station
Aerial views, schematic drawing and maps of Kenilworth
Station
|