·  LMS  ·  GWR  ·  LNER  ·  Misc  ·  Stations  ·  What's New  ·  Video  ·  Guestbook  ·  About

Birmingham New Street - Southern Approaches

LMS Route: Rugby to Wolverhampton
LMS Route: Birmingham New Street to Tamworth
LMS Route: Birmingham New Street to Nuneaton
LMS Route: Birmingham New Street to Lichfield
LMS Route: Birmingham to Evesham

The southern approaches to New Street station were complex reflecting the development of the LNWR and the Midland Railway in Birmingham as they outgrew the three Curzon Street stations and Lawley Street station. Moving in stages to the Grand Central station that became New Street and with the development of track realignment and the installation of new connections to accommodate an ever increasing number of services, the southern approaches became a complex but interesting feature of passengers arriving at New Street station. Therefore Proof House Junction, Gloucester Road Junction and other features situated between New Street station and Curzon Street and Lawley Street are to be managed on this web page.

London & North Western Railway connections

Select an image below to view the larger version with accompanying text:

Looking from a down MR train towards New Street station near Proof House Junction on 7th March 1951
Ref: lnwrbhm_sa2332
DJ Norton
Looking from a down MR train towards New Street station near Proof House Junction on 7th March 1951
Looking towards Proof House signal cabin from Park Street with the LNWR lines on the left and the MR lines on right
Ref: lnwrbhm_sa2323
DJ Norton
Looking towards Proof House signal cabin from Park Street with the LNWR lines on the left and the MR lines on right
Looking south with Curzon Street Goods Station on the left and Proof House Junction signal cabin on the right
Ref: lnwrbhm_sa414
JC Flemons
Looking south with Curzon Street Goods Station on the left and Proof House Junction signal cabin on the right
Close up showing Curzon Street's station's fish sidings on the left and Proof House signal cabin on the right
Ref: lnwrbhm_sa414a
JC Flemons
Close up showing Curzon Street's station's fish sidings on the left and Proof House signal cabin on the right

Looking south with Curzon Street on the left, the line to Aston in the centre and the lines to Coventry on the right
Ref: lnwrbhm_sa431
JC Flemmons
Looking south with Curzon Street on the left, the line to Aston in the centre and the lines to Coventry on the right
Close up of Curzon Street' No 1 signal cabin and Proof House Junction and a number of buildings in the yard
Ref: lnwrbhm_sa431a
JC Flemmons
Close up of Curzon Street' No 1 signal cabin and Proof House Junction and a number of buildings in the yard
Close up showing the bridge at the start of the Vauxhall viaduct forming part of the Birmingham Canal's tunnel
Ref: lnwrbhm_sa431b
JC Flemmons
Close up showing the bridge at the start of the Vauxhall viaduct forming part of the Birmingham Canal's tunnel
Looking towards Vauxhall viaduct from Grand Junction signal cabin with Banbury Street Wharf on the left
Ref: lnwrbhm_sa2314
DJ Norton
Looking towards Vauxhall viaduct from Grand Junction signal cabin with Banbury Street Wharf on the left

Close up showing a steam locomotive standing on one of the roads adjacent to the cattle loading dock
Ref: lnwrbhm_sa2314a
DJ Norton
Close up showing a steam locomotive standing on one of the roads adjacent to the cattle loading dock
Close up showing the bridge carrying the former New Street to Vauxhall line over the main line to London
Ref: lnwrbhm_sa2314b
DJ Norton
Close up showing the bridge carrying the former New Street to Vauxhall line over the main line to London
Looking towards Coventry with the Grand Junction signal cabin in the centre of the photograph on 10th May 1960
Ref: lnwrbhm_sa2320
DJ Norton
Looking towards Coventry with the Grand Junction signal cabin in the centre of the photograph on 10th May 1960
Close up showing the headshunt used when marshalling freight for Curzon Street Goods depot and Landor Street
Ref: lnwrbhm_sa2320a
DJ Norton
Close up of the headshunt used when marshalling freight for Curzon Street Goods depot and Landor Street

Close up showing Grand Junction signal cabin, part of Exchange Sidings and and the works of Wrights Ropes Ltd
Ref: lnwrbhm_sa2320b
DJ Norton
Close up showing Grand Junction signal cabin, part of Exchange Sidings and and the works of Wrights Ropes Ltd
Looking towards Aston from just north of Lawley Street bridge on the Vauxhall viaduct on 5th August 1951
Ref: lnwrbhm_sa2321
DJ Norton
Looking towards Aston from just north of Lawley Street bridge on the Vauxhall viaduct on 5th August 1951
Looking towards Aston from just north of Lawley Street bridge on the Vauxhall viaduct on 2nd June 1954
Ref: lnwrbhm_sa2322
DJ Norton
Looking towards Aston from just north of Lawley Street bridge on the Vauxhall viaduct on 2nd June 1954
View of the gradient post near Proof House Junction showing the change in the descent towards New Street station
Ref: lnwrbhm_sa2319
DJ Norton
View of the gradient post near Proof House Junction showing the change in the descent towards New Street station

Map of the junction between the Midland and the Great Western at Bordesley and Gloucester Junction
Ref: lnwrbhm_sa1890
Anon
Map of the junction between the Midland and the Great Western at Bordesley and Gloucester Junction
Schematic showing the original routes to New Street station from Aston, Coventry and Gloucester
Ref: lnwrbhm_sa2315
J Copsey
Schematic showing the original routes to New Street station from Aston, Coventry and Gloucester
Schematic showing the lines and junctions between the MR and LNWR as they approach New Street station
Ref: lnwrbhm_sa2312
J Copsey
Schematic showing the lines and junctions between the MR and LNWR as they approach New Street station

Midland Railway connections
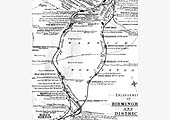
Looking east from the rear of a DMU on the former MR lines into New Street at Proof House junction on 9th May 1955
Ref: mrbhm_sa2318
DJ Norton
Looking east from the rear of a DMU on the former MR lines into New Street at Proof House junction on 9th May 1955
View of the LNWR signal box which controlled the movements at Exchange Sidings seen on 23rd December 1965
Ref: mrbhm_sa2326
ND Mundy
View of the signal box erected by the LNWR to control goods traffic betwen the LNWR & MR at Exchange Sidings
Ex-LMS 2-6-0 'Crab' No 42890 eases around Gloucester curve as it heads an up Class A express service
Ref: mrbhm_sa1898
DJ Norton
Ex-LMS 2-6-0 'Crab' No 42890 eases around Gloucester curve as it heads an up Class A express service
Ex-LMS 4-6-0 Jubilee class, No 45682 'Tralfagar' drifts tound Gloucester curve on an up express to Bristol
Ref: mrbhm_sa1899
DJ Norton
Ex-LMS 4-6-0 Jubilee class, No 45682 'Tralfagar' drifts tound Gloucester curve on an up express to Bristol

Looking towards Gloucester Junction with the line to New Street on the left and to Saltley on the right
Ref: mrbhm_sa1900
DJ Norton
Looking towards Gloucester Junction with the line to New Street on the left and to Saltley on the right
Ex-MR 4F 0-6-0 No 43949 is seen passing St Andrews on a Class J empty wagon working to Kings Norton sidings
Ref: mrbhm_sa1511
M Mensing
Ex-MR 4F 0-6-0 No 43949 is seen passing St Andrews on a Class J empty wagon working to Kings Norton sidings
Ex-Midland Railway 3F 0-6-0 No 43346 is seen working hard as it banks a Class K short pick up mineral service through St Andrews	on 6th May 1956
Ref: mrbhm_sa1897
M Mensing
Ex-MR 3F 0-6-0 No 43346 banks a Class K short pick up mineral service through St Andrews on 6th May 1956
Looking towards Camp Hill station and goods yard with Bordesley Junction Signal Box controlling the connecting lines to the GWR on the left
Ref: mrbhm_sa1895
DJ Norton
Looking towards Camp Hill with Bordesley Junction signal box controlling the connecting lines to the GWR on the left

Looking towards St Andrews whilst in the distance a 4F stands under Coventry Road bridge whilst to the right an unknown LMS locomotive waits on the GWR connecting line
Ref: mrbhm_sa1893
DJ Norton
Looking to St Andrews from the Camp Hill line and on the right the line leading to the exchange sidings
Vlew of Bordesley Junction signal box and the signal controlling access from the GWR to the LMS
Ref: mrbhm_sa1894
DJ Norton
View of Bordesley Junction signal box and the signal controlling access from the GWR to the LMS
Night time view of Bordesley Junction Signal Box showing the various levers for the signals and junction points
Ref: mrbhm_sa1892
DJ Norton
Night time view at Bordesley Junction Signal Box showing the various levers for the signals and junction points
Ex-LMS 2-6-0+0-6-2 Garratt No 47967 is seen running bunker first past Bordesley Junction Signal Box on a Class J through empty mineral working
Ref: mrbhm_sa1896
RS Carpenter
Ex-LMS 2-6-0+0-6-2 Garratt No 47967 running bunker first past Bordesley Junction Signal Box on a Class J working

LMS Bordesley Junction Signal Box diagram showing the junction layout numbered for the appropriate levers
Ref: mrbhm_sa1891
DJ Norton
LMS Bordesley Junction Signal Box diagram showing the junction layout numbered for the appropriate levers
A 25th October 1964 view of Landor Street Junction signal box built by the Midland Railway in 1896
Ref: mrbhm_sa2327
RJ Essery
A 25th October 1964 view of Landor Street Junction signal box built by the Midland Railway in 1896
Ex-LMS 4F 0-6-0 No 44413 passes Landor Street Junction signal box on the Camp Hill line with a down freight
Ref: mrbhm_sa2329
RS Carpenter
Ex-LMS 4F 0-6-0 No 44413 passes Landor Street Junction signal box on the Camp Hill line with a down freight
Ex-LMS 0-6-0 4F No 44279 passes over ex-LMS 4-6-0 No 44848 at Brickyard Crossing on 19th June 1954
Ref: mrbhm_sa2325
TJ Edginton
Ex-LMS 0-6-0 4F No 44279 passes over ex-LMS 4-6-0 No 44848 at Brickyard Crossing on 19th June 1954

Brickyard Crossing signal box located on the Camp Hill line adjacent to the L&BR route on 25th October 1964
Ref: mrbhm_sa2328
RS Carpenter
Brickyard Crossing signal box located on the Camp Hill line adjacent to the L&BR route on 25th October 1964
British Railways Sulzer Type 2 Bo-Bo No D5228 is seen working a ballast train on the up line on 3rd August 1969
Ref: mrbhm_sa1901
W Wright
British Railways Sulzer Type 2 Bo-Bo No D5228 is seen working a ballast train on the up line on 3rd August 1969
Looking from the former L&BR line towards Landor Street Junction signal box on 8th September 1957
Ref: mrbhm_sa2317
DJ Norton
Looking from the former L&BR line towards Landor Street Junction signal box on 8th September 1957
Close showing the original Duddeston to Derby Junction viaduct with Lawley Street Goods Station beyond
Ref: mrbhm_sa2317a
DJ Norton
Close showing the original Duddeston to Derby Junction viaduct with Lawley Street Goods Station beyond

Close up of Landor Street Junction signal box and the water tower supplying the water columns to the area
Ref: mrbhm_sa2317b
DJ Norton
Close up of Landor Street Junction signal box and the water tower supplying the water columns to the area
A three-car cross country DMU set on a Derby to New Street service is seen approaches Landor Street signal box on 3rd August 1969
Ref: mrbhm_sa2324
W Wright
A three-car cross country DMU set on a Derby to New Street service is seen approaches Landor Street signal box
Standing on Landor Street under bridge looking towards Landor Street Junction signal box with Saltley shed behind
Ref: mrbhm_sa2330
JC Flemmons
Standing on Landor Street under bridge looking towards Landor Street Junction signal box with Saltley shed behind
View of the embankment and bridge carrying the Coventry to New Street line over the  Derby to New Street line
Ref: mrbhm_sa1902
DJ Norton
View of the embankment and bridge carrying the Coventry to New Street line over the Derby to New Street line

View of the main line from Derby passing beneath the former London to Birmingham L&BR lines
Ref: mrbhm_sa2331
JC Flemmons
View of the main line from Derby passing beneath the former London to Birmingham L&BR lines